Showing posts with label forest fashion. Show all posts

Tuesday, September 2, 2025

First Meal of Fall: Sweet Potato Gnocchi


I woke up this morning to a cozy, cloudy day. My favorite kind of day. A day for getting up early and lighting a cinnamon apple candle while brewing coffee and baking a batch of cornbread. Watching VHS tapes of Little Bear and vintage Scooby Doo while decorating for fall... 

I made this sweet potato gnocchi on a whim for dinner the other night, rolling out the dough while gazing out my kitchen window at a little yellow house with a lawn that is covered in leaves. I'm so happy i have a room with a view, a new home, and time to do things like make elaborate meals while sipping a glass of red wine...


Ingredients:

2 large sweet potatoes

2 cups flour

1 egg

1/2 tsp salt

1/2 tsp nutmeg

1 tbsp butter

1/2 tbsp sage

2 cups spinach

1/2 tsp garlic powder

1/2 tsp onion powder


Instructions:

Preheat the oven to 350 degrees and bake sweet potatoes until tender, about an hour. Remove the skins and mash the potatoes in a large mixing bowl. Mix in egg, salt and nutmeg. Stir in the flour until dough ball forms. On a lightly floured surface, use a rolling pin to roll out the dough to 1/4 inch thickness. Add more flour, a little at a time if dough becomes too sticky. Using a leaf shaped cookie cutter, cut out pieces and make leaf veins with a bamboo skewer rolled in flour. Bring a pot of salted water to boil and cook gnocchi until they begin to float to the surface, about five minutes. Drain and set aside. Meanwhile, saute the spinach with garlic and onion powder while melting butter and sage together. When the spinach is wilted, add gnocchi and sage butter sauce. Enjoy!


Friends of the forest, what are your favorite fall foods?

Thursday, March 14, 2024

Meet the Masters: Ashley Green, Artisan Accessorist


The author pictured wearing a pinecone pendant by the artist.


Friends of the Forest, today I would like to introduce you to an artist who creates one-of-a-kind accessories with items found on the forest floor. As you can see, I am wearing one of my favorite pieces from Natural Shed Jewelry, a pinecone heart pendant. Now everyone, give a warm welcome to the craftsman.

Ariel Greenwood: Hello Mr. Green, thank you for joining us on The Forest for a pinecone and a pint! I am so excited to showcase your craft and talk to you today. Now, what exactly is it you do? 
Ashley Green: I'm Ashley Green Jeweler / GURU of Natural Shed Jewelry. I make jewelry out of natural items that I find or purchase. Some of these creations are pinecone heart necklaces, natural shed deer antler burr necklaces, antler rings, bent wood rings, denim rings, and more. As I find more material that inspires me the list will grow...


Ariel: What kind of tools you do you use, what is the process behind making your jewelry?
Ashley: The tools I use to build my creations are mainly jewelers hand tools, but there are a few machines as well. I rebuilt a 1943 Craftsman Bandsaw for the cutting of antler, bone & pinecone that I use in my craft. I purchased a lathe a few years back, that I have collected all the parts needed to use for rings and other future projects. I also use drills, dremel, torches, and UV light. All these tools are used in the forging of my materials to craft my end result, beautiful natural jewelry.
 The process for my pinecone adornments is as follows:
I slice the pinecone on the bandsaw I mentioned. Then select if they will be sealed natural or with one of the many stones, crystals, gems, cabochons (shaped stones), or other nature items found that I was inspired to use. Now, the sealing process. I use a high-grade UV resin to seal the pinecone and its adornment by applying to resin in even coats over the entire medallion. The process takes a steady hand and several hours to complete. When the adornments are completely sealed and dry, they are then drilled and outfitted with necklace bails that are sealed with resin to the chosen top. Cord, leather straps, or hemp jute are then selected and threaded through the bail and finished with stainless steel crimp cord ends, jump rings and either lobster claw clasps or toggle clasps. After this production they are then boxed or trayed to be sold to their intended owners.
Ariel: What inspires you to create?
Ashley: I find my inspiration in nature and through the media I work with. Holding a natural object. A pinecone, I don't think much of. That is, until I cut into it and the inside is revealed. Each heart of each pinecone I use look as if they are perfectly painted mandalas. The golds, fawn and mahogany colors that were used look as if painted by the creator himself. Inspiration to see in every medallion. 
The antler burrs I purchased intending to do scrimshaw or carving. I have done stone or gem inlays that turned out to be a great match to complement one another. Looking at them one day I saw flowers. Sunflowers, cone-heads, daisies. I asked my wife to paint some of them to resemble these flowers. I see myself incorporating both mediums, antler and pinecone into one adornment. However, that inspiration has not come to pass...
Ariel: Does music inspire you? Do you listen to music while you work?
Ashley: Music on or off I've no preference. I find building my adornments a meditative feat. Staring at these natural items, the nature choir that ensues in my head is music enough. It is a reward when each handmade medallion is set to the next phase of completion. Thought + Vision are music enough oftentimes.
Ariel: Do any animals or spirit animals inspire your work?
Ashley: I live on a farm in northern Harford County, Maryland and there are many animals on the farm as you know. And they do inspire me. I don't think that the yard pigs, dogs, cats or horses lend to my inspiration. But they do help. It is felt when they are helping/sleeping at my feet in the workshop. When the lab is snoring across the shop. Or when Russel is at my feet begging to see what the last step turned out like. He likes the pictures. Through that I feel love.
Ariel: What does a pinecone symbolize to you?
Ashley: When my wife and I went on our first trip to Assateague Island on the Atlantic Coast of Maryland we were camping and I suggested we collect a pinecone as a keepsake. The first one was labeled with the campground receipt tied to the cone with a ribbon. Anecdotes and things that happened were recorded on the receipt. My wife started a basket in her office with these keepsakes in it. Ever since that first one, we have collected pinecones from many corners of this great land and the basket has grown in size. So pinecones mean love, bliss, travel, moving forward and remembrance to me. 
My wife is a skilled painter of mandalas. The lines, dots, curves repeat into a meditative eternity. Seeing this repeated the first time I saw the inside of a pinecone heart. There it lives, nature's mandala. Perfect in every way, simple yet complex and never-ending. Eternal, an internal spiral. I can feel this. Pinecones symbolize to me, the continuance of...
They can be ALL.
Ariel: And where do you find your pinecones?
Ashley: We know pinecones can be found on most pine trees in the forest. The pinecones I use for my jewelry are knob pinecones. The knob pinecones grow in the mountainous regions of Northern California and Oregon. The pinecones don't grow on the outer limbs of the tree singly like most pine do. The knob pinecones grow in clusters of three to six, sometimes double that, on the interior branches or trunk of the conifer. When found they appear to be hugging the tree, they grow so close. And unlike most conifers, the knob pinecone doesn't shed its cones yearly. Instead, they remain on the tree for something like thirty years in extreme cases. The knob pines have been called "the tree that swallows its cones". Oddly, the heat from forest fires causes the knob pinecones to melt the resin/sap and allow it to open their cones which makes them drop their seeds to the scorched forest floor. To be replanted by nature as they are there to reforest the land when this happens.

A pinecone pendant with a malachite clover.

Ariel: What is the smallest pinecone you have ever found? And the largest?
Ashley: The smallest pinecone that comes to mind when asked this question is the pinecone of the golden larch pine tree. One of only twenty deciduous pine trees. Eleven of them being in the larch family. Deciduous meaning it drops all its needles in the winter and regrows them in the springtime. Now their pinecones are the size of a dime, tall and round. They are primarily grown on the East Coast. It's called the Golden Larch because when it cuts off its growing season, it looks like a big golden flame standing there in the woods.
The largest pinecone that comes to mind would be the cone of the sugar pine. Their cones can grow up to two feet long and six inches in circumference. Now that's a big cone.
Ariel: I used to craft with pinecones a lot. I used the tiny ones to make rings. Tell you what, I'm going to give you a few pinecones from my collection. Do you think you could make a pendant out of a pinecone this small?
Ashley: I do like the small pinecones. Yes, I believe that I will let the Larch pinecones make an appearance in my craft. I do like their look and I have always had a fondness for these cones. As for a pendant, they may be too small to hang alone. I can see them as an added dangle charm.
Ariel: Or you could make earrings from them! Do you like to do any other pinecones crafts?
Ashley: I have seen other crafters make many other items out of pinecones. Drawer pulls, knife handles, and other types of old-fashioned jewelry. I have seen pinecones suspended in resin then turned on a big lathe into fruit bowls, vases and other vessels. There is no end to their potential use. But as for now I have not ventured past crafting my adornments.
Ariel: Pinecones also make good fire-starters if you are camping or have a fireplace at home...
Ashley: I agree, I have used pinecones as a firestarter. The older the better. The resin in them when heated is like lacquer thinner when it comes to fire.
Ariel: Do you think you could make jewelry out of petrified wood?
Ashley: I do believe you can make jewelry out of petrified wood. You can wire wrap raw pieces, such as a raw agate that can be cut and shaped. I have some polished, shaped pieces of petrified wood in my rock collection for when the right pinecone medallion calls for it.  All the agate stones are beautiful added adornments to any natural material.


Ariel: What is your favorite gemstone?
Ashley: Hard question. I just switched from tiger's eye and labradorite to turquoise. But, those are not gems per se. I like the option to use all the stones and gems I can in my work without favorites. I love all types of natural materials.
Ariel: How does the intersection of tree and stone inspire you?
Ashley: When I finish one of my adornments. Knowing that how I feel then will be amplified tenfold by the person whom it was made for who finally picks it up and says, "This was made for me!" That look, that is what inspires me. The stone selects the medallion, I just move to make it. It inspires me that some of my adornments that I thought weren't that great, those are the ones that I have seen the greatest reaction from. The last wellness open house I set up at, I was watching two customers talking and admiring each other's medallions back and forth. That was inspiration. To see the JOY that I made by being the go-between. That inspires me to do more.
Ariel: Which art trends inspire your current work?
Ashley: I definitely find inspiration in nature, the elements, and the force I use to bring it all together. It can be seen in all the Natural Shed Craft pieces. The art of nature pure.
Ariel: How has your style changed over time? How long have you been creating?
Ashley: I have been working with the natural material of pinecone, bone and antler in this fashion for about three years now. Building my shop to make it what it is today. Gaining new tools and learning how to construct with them. There has been a lot of trial and error, learning curves to making the best pieces of art to my ability. I feel like its not really a hobby when I feel the life it gives me, when I handcraft every single one. So, my style has not changed as much as it has grown. Like a tree.
Ariel: Are there any other master jewelers whose work inspires you?
Ashley: I just got back from a trip out west. Arizona, to be precise. I collected many different types of materials and came back with many ideas of how to incorporate them into my craft.  Etched in my mind are the truly stunning pieces of Native American jewelry I have touched and admired on my trip. They were and are the masters in my opinion. Mimicked and replicated, does true genius happen by mistake at first.  Hopefully Natural Shed Jewelry's feeling can live on and inspire others in its mastery!
Ariel: Well, you've certainly inspired me. And the many readers of this blog, I'm sure. Say, next time you're in Arizona you should visit Quartzsite. It is a small town near the border of Arizona and California. They host a huge gem and mineral show there every year.
Ashley: Right.
Ariel: Well, thank you so much for taking the time to talk to us here at The Forest. I will be bringing you a bag of pinecones soon...

If you would like to order a pinecone pendant, email arieltheauthor@gmail.com

Saturday, November 19, 2022

Squirrel Stamped Shirt


The squirrel silhouette is an iconic cottagecore motif. We go nuts for the pattern on clothing and accessories. Now you can make your own squirrel stamped shirt to wear this season...


First, make the squirrel stamp by carving it from a piece of linoleum, rubber, or wood.


You will need a brayer and some fabric printing ink. A brown cotton shirt will be the base for the design. We stocked up at the local thrift stores and got several shirts as part of a five dollar fill-a-bag sale.


Roll the brayer through the ink and apply to the stamp. Start stamping the squirrel pattern onto the fabric,using fresh ink with every imprint.


Continue stamping squirrels until the front of the t-shirt is covered completely. Now it's time to add the details...


Lace ribbons can be used to trim the sleeves of the shirt, if desired...


Sew the lace inside the sleeve. Now add a small button to the front. I chose a white acorn button that I have had for 12 years...


Sunday, January 30, 2022

Making a Mushroom Stamped Skirt


It all started with the intention to find or create vintage-inspired forest psychedelic fashion. Then I was inspired by some hand-carved mushroom stamps made by Maude Forbid, a printmaker from the southwest. I have always loved making my own lino blocks and decided to try my hand at carving a mushroom stamp after work... 


I went to my workshop garage to get my linoleum sheets and speelballs. Unfortunately, I couldn't find them so my boyfriend let me borrow his supplies and the stamp came out better than I imagined. I used white block printing ink to stamp the image onto some light brown fabric I picked up last summer at Scrap Bmore for a few bucks. 


Once I had printed a whole yard of fabric, I gathered my supplies: dark brown two-inch elastic waistband, extra strong strong brown thread, sewing scissors and wooden buttons with trippy flowers or vibrational designs... 


First, I measures a piece of elastic around my waist and cut it at the desired width. Then, I laid out the fabric on the workshop table and hand-sewed the elastic to the top of the fabric with a blanket stitch.


Next, I folded the entire piece of fabric in half and turned it inside out to sew a seam down the back and close up the garment. Then, I tucked in two darts at the waist and sewed shut to create some shape.


Hemmed the bottom of the skirt by hand using a simple blanket stitch again. Finally, I chose a button to add front and center to finish the skirt. I decided to go with this button because it reminded me of a vibration...


And that's a wrap! This skirt is very easy to make and can be adjusted to fit anyone.  The elastic waistband makes it easier to create as you won't have to deal with zippers or complicated pattern making.

Monday, October 18, 2021

Tips for Setting up a Workshop


So you've settled on a decent location and rented your garage. Now the fun part comes...setting up shop!

We showed you how to find space to set up a workshop in Part 1: Tips for Renting a Garage. Read on for our story of trial and error, with pro tips for setting up your workspace.

Our journey to finding the perfect place has been a long one. It all started eight months ago when we decided to rent a garage for workshop space. We looked at many different units before applying for the perfect place, the garage attached to my residential building. It was prime real estate in an ideal location, in a mixed-use area near other small businesses. Everyone in the neighborhood has yard sales on weekends, so hosting a pop up shop is as easy as pulling up the door. The garage faced the sidewalks and streets of a busy intersection.

As fate would have it, there were several setbacks along the way. First, we had to wait three months for the garage to become available.  Then, the week of move-in, we got the call. The owner of the building had made a mistake and would not be renting the garage after all. We would have to wait two more weeks for another unit to be transferred to us. A garage in a terrible location, down an alley behind a large industrial building.


The path to following a dream is never easy, but you must keep traveling on...


Through hard work and perseverance, our team was able to make it work.  It took many helpful hands to get this place ready. First, we had to sweep out all the dirt and carefully collect the cobwebs. The spider's quickly became the familiar of the workshop, as they are nature's sewing spinners. After an intense cleaning, we were lucky enough to find most we needed for free. Emily and I were walking down the street after just starting to work on the garage when we found a beautiful iron clothing rack outside a college dorm!


We were also able to find a clear shower curtain in a free box, which is a must if you are going to keep any clothing on display in a garage. The plastic cover keeps fabrics clean and dry.


Anya and I knew we would need good quality storage for all the fabrics, so we went with ULINE plastic storage bins. They are industrial grade, sturdy and waterproof. We originally wanted to order lockers, but they are very hard to obtain. 


Before we had access to this unit, I made a vision board with everything I needed to get. One of the items was the same printer/scanner combo I had in my old workshop ten years ago. I tried to find it online, but HP stopped manufacturing it. Luckily, 
Anya and I found a used model at Church of the Guardian Angel Thrift Store. We also found a kitchen cart to use as a shipping station.


The front of the garage is a small area for tarot and tea readings. I made a curtain of vines to divide the two halves of the space and keep storage behind the scenes. As I was sitting here eating a matcha cookie, my first customer Maklin walked by for a $5.00 reading. Maybe it's not such a bad location after all...


Sunday, May 9, 2021

How to Loom-Weave a Scarf


The art of loom weaving is an ancient practice of creating textiles that is very easy to do with a few simple supplies.  For this project, all you need to make a scarf is a hand loom and yarn.  

The loom in the example was part of a children's craft kit found at a yard sale years ago.  You can find one at a craft store or make your own with a small wood frame and nails for pegs.  A 7 to 9 inch loom is perfect for this project.    To start, pick a good quality yarn...something plush and velvety in a dark color such as black, forest green, or raspberry red.  Avoid cheap acrylic yarns at all cost, they will not look or feel right.  We are aiming for an earthy, luxurious feel.


First cut a piece of yarn 200 inches long and begin to wrap around the pegs at the end of the loom, trying a knot at the top three times.  Create a base of weft ( horizontal lines) to weave the warp into.


Next cut out 60 strands of yarn measuring 65 inches long.  Begin to weave these warp strings into the loom base in the plain pattern.  Alternate the "over and under" with each strand to create stability.  Push the warp strings to the edge of the loom and keep them snug against each other with no gaps between.  When you reach the bottom of the loom, loop the string over the bottom weft to secure it.


As you complete each square, carefully remove from the loom pegs and then create a new weft base with another 200 inch piece of yarn.  Continue moving the warp strings into the new grid each time you finish a rectangular section.  


It takes about 45 minutes to finish each rectangular section.  Because this craft is so repetitive and simple, its the perfect project to do while watching movies or tv.  I like to do one or two squares a night after work while watching vintage 60's Disney movies...

When you are finished, simply cut the end strands into any style you want and it's ready to wear!


Sunday, May 10, 2020

Daily Outfit: Wooden You Like to Know?


As I went walking through the park seeing squirrels scurrying through the overgrown ivy on the fallen trees, I heard a noise behind me.  A deer darting through the dell!  Running as fast as the wind, it got away before I could take a picture...


Luckily, I was wearing my doe necklace.  This charm was handcrafted by me using a ten cent toy.  It reminds me to walk softly in the forest, with fawns footsteps...To leave no trace and be quiet.


Wood-grain patterns help blend in with the trees, aiding in camouflage when one wants to walk unnoticed.  The Dainty Squid makes quality zippered bags.  Other faux bois accessories include glasses and cases.


I was recently gifted this skirt by Issac Mizrahi with a light wood fabric has a very vintage 70's vibe.  And when wandering the woods, my Hunter boots that I found for free keep you safe from snakes, mud and more!


Sunday, June 9, 2019

Dressing Daisies: A Study of Style in Czech Cinema


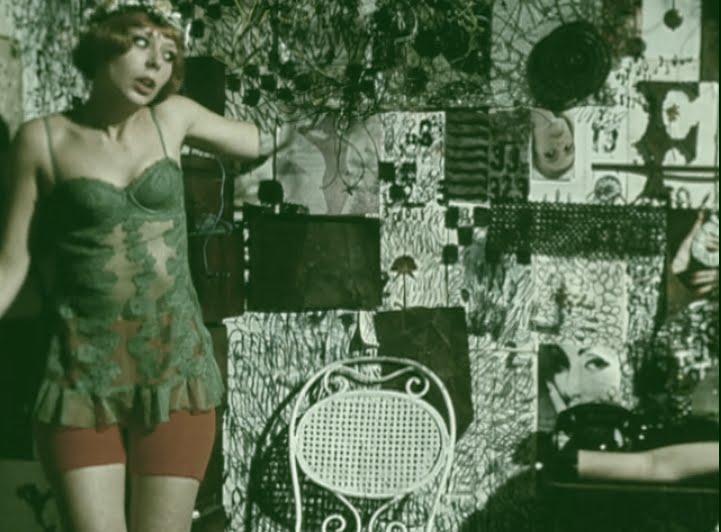
Discovering rare psychedelic films like Daisies is always a sweet summer treat.  This gem from the Czechoslovak New Wave (Directed by Vera Chytilova, this movie was banned in the 60's by communists.) is an absurdist romp about two girls out to become rotten as green apples in a corrupted world.  Their misadventures are wild and whimsical, an endless source of inspiration... 

 
Meditating on a bed of AstroTurf and apples, while palm leaves weave the headboard is my aesthetic goal for the summer.  What better way to recharge after a night of romping in the woods before a glass of green juice and a jog down the beach?
 
 
Exploring a forest farm to steal crops requires camouflage.  Items found in nature can double as a hat made of bushes or an old fishing net can become a shawl.  Pair flower crowns with everything!
 
 
Brunch in bed with my best friends while lounging around in silk pajamas in paisley prints. Pairing lingerie with cyclists shorts for those hot days around the house.  Apples and croissants, avocado toast and acid...
 
 
A summer of 60's fashion and frenzy sounds fun to me!  Watch Daisies on The Criterion Channel.


Sunday, February 3, 2019

The Clothing Swap 2019


The Clothing Swap is a Baltimore tradition.  Founded in 2013 by Anna Grothe, this semi-annual
event has become a community of cool people swapping clothes.  From fabulous forest frocks to vintage 60's pieces, most of my wardrobe since moving to the east coast has come from this swap.
When I first came to Baltimore four years ago I attended the Clothing Swap in a park off Keswick Road in the Hampden neighborhood.  I ran into friends, coworkers, and all sorts of interesting people swapping clothing of all colors, sizes, and shapes! 

Men's T-shirts donated by local design company Horse and Hare

I recently attended the first Clothing Swap of 2019 and came back with a lot of wonderful pieces: a black literary witch dress covered in the text from a dictionary page, a handmade hemp renaissance dress dyed purple, gratuitous green garments , an Andrew Jihad Jackson band tee, shirts with the covers of my favorite books printed on them,  vintage 60's florals, a corset belt, a red velvet mini dress, lingerie, and so much more!  I can't wait to share some of these clothes in my upcoming daily outfit posts...


Now for my Clothing Swap strategy:  I usually go through my closet a week before the event.  I sort, organize and get my clothes in order while purging many items to make room for the new goods!  I wash a load of donations and fold them up into a box.  Then the day of the swap, I load that box into my cart and walk to the swap.  I usually arrive early, sort clothes into their respective sections.  Then I start to make my rounds with the cart, tossing in any green or brown basics while keeping my eyes peeled for cute dresses.  I usually stay throughout the whole event as people show up at all times to bring their old clothes.  Like a bird of prey, I stalk the stylin' folks to see what they put down then swoop in to grab it.  It's also fun seeing friends from the community and catching up.  I can't tell you how many friendships I've struck up just by pointing out a cute color or pattern and telling some stranger "This is so you!" or "Look it's in your color!"

If you live in or near Baltimore, I highly encourage taking advantage of this swap.  If not, why not start your own swap in your city?

Tuesday, November 4, 2014

Daily Outfit: A Little Doe


Today I was getting dressed when I discovered an old shirt in the back of my closet.  A forgotten tee with a deer on it.  Longing to wear it again, I put together this outfit and went to do my makeup.  I remembered that I had been wanting to try a deer-inspired look this year.  Here was my attempt...


I used an orange blush with white eyeshadow to define and add dots.  Surprisingly, it came out well... I added an old deer headband I made a long time ago...


Here is a close-up shot of the top I wore.  "We All Can Use A Little Doe" I think I got this for a quarter at a thrift store, either that or dumpster dived it.


Since polka dots are about the easiest "nail art" for me to do quickly, I thought to make a deer print inspired look.  Paired with a deer ring I had featured here before, this completed the look.